If you want to show a native map view within your watchOS App you have currently two options: using either the „classic“ watchOS Interface elements or SwiftUI.
SwiftUI is relatively new and was introduced with watchOS 7 on the Apple Watch (and with iOS 14 on the iPhone/iPad). SwiftUI is still a work in progress, so there are limitations which will be resolved in the future. But when it comes to the MapKit it is already much more powerful than the „classic“ watchOS interface elements. So in case you don’t care about compatibility with older watchOS releases and don’t mind in creating your user interface in code, you should use SwiftUI.
But if your App should still work under watchOS 6 and older or you want to create your user interface graphically via Storyboard, you may still need to use the classic watchOS API. Unfortunytely the classic MapKit API is extremly limited. While the map view of SwiftUI lets you scroll and zoom the map out of the box, the classic watchOS API won’t support this at all. Even worse, tapping the Map will immediatelly quit your App and will launch Apple’s Maps App. Also while SwiftUI lets you place any number of annotations (for example pins, markers) on the map, the classic watchOS only supports up to 5 annotations.
This blog post will explain how you can implement scrolling and zooming capabilities with the classic watchOS APIs, so you can get a similar experience as with the new SwiftUI.
The topic of this blog post is based on the experiences of my iOS/watchOS Apps Pado (all about geo tracking for sports, vacation etc), and Wigemo 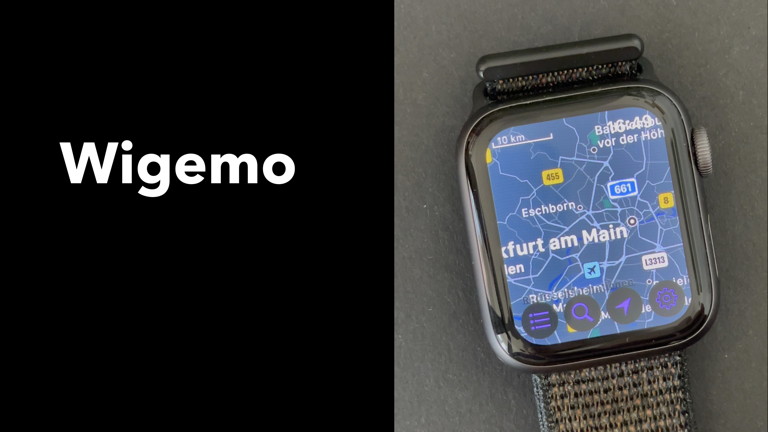 (a general Maps App where you can save and manage your favorite places, plan vacations etc, with a direct link to Wikipedia). In both Apps you have a MapView which can be scrolled and zoomed without restriction. In Pado the map will also show tracks (overlays) on the Map and in Wigemo the map can have any number of annotations (pins) and is even able to cluster these pins (combine multiple pins into one with a number if they are getting too close). Check out the video that is linked here, how this looks in Wigemo. Especially Pado was developeed many years before Apple introduced SwiftUI, therefore SwiftUI was never an option here.
Step One: Creating your Userinterface in a Storyboard
Since we create an App using the classic watchOS API, the user interface is build via Storyboard. In the Storyboard, just drag a Map (WKInterfaceMap) from the Library window into an Interface controller. Because we use the digital crown for zooming, also add a WKInterfacePicker into the Interface Controller in the Storyboard. Then connect both with the IBOutlet varaibales in the code file of the InterfaceController.
class InterfaceController: WKInterfaceController {


    @IBOutlet weak var mapView: WKInterfaceMap!

    @IBOutlet weak var pickerView: WKInterfacePicker!
Issue One: Taps are leaving the App
The first issue to solve would be that tapping the map would immediatelly quit the App and switch to Apple’s Map App. This task is an easy one, all that needs to be done is to remove the checkmark of the „enabled“ checkbox in the „Maps“ section of the „Attributes Inspector“ panel in the Storyboard in XCode. Then the map view will ignore taps and so the user won’t be kicked out of the App anymore.
Issue Two: Zooming
For the zoom feature we follow the convention which almost all popular map providers (OpenStreetMap, Google, Apple etc) are using: A zoom level of 0 covers the whole earth, adding 1 to the zoom level will divide the visible area by 2 (horizontally and vertically). With the length of the equator and the current zoom level it is then possible to find out how large the visible area is. Together with the center coordinate of this area we have all information to configure the mapView to show exactly this region.
Therefore we first define a few constants for the min and max zoom level and the equator length (in meters). The zoom level is initialized with a useful default value and will later change whenever the user uses the digital crown to zoom in or out. The visible distance of the Map can be directly calculated by the equator length and the zoom level. The location is the current center coordinate of the map, initialized with any coordinate you like (in this example this is simply a fixed one, but you can also use the Location Manager to ask for the user location) and it is also later changed by the user when scrolling the map.
    let minZoomLevel = 4.0

    let maxZoomLevel = 18.0

    let equatorLength = 40075000.0


    var zoomLevel = 10.0

    var visibleDistance: Double { return equatorLength / pow(2, zoomLevel) }

    var location = CLLocationCoordinate2D(latitude: 49, longitude: 9)
The next step will be to setup the Picker control which is used to zoom in and out. The first step is to connect the IBAction „zoomAction“ in the code with the picker control in the storyboard. „zoomAction” will be called whenever the digital crown is rotated.
In the „awake“ method we initialize the Picker control. In order to get the zooming more smooth, each step of the digital crown should increase or decrease the zoom level by 0.5, therefore the picker control needs twice as many picker items as zoom levels are available (you can add more items per zoom level to get an even more smooth experience, but this also has the disadvantage that zooming fully in or out requires more steps and needs more time which can be less comfortable to use – using steps of 0.5 is a good compromise). These PickerItems don’t need a title because they are invisble anyways, so we simply reuse a single PickerItem and add it multiple times into the Picker control. Then we set the currently selected Picker item to the one which represents the current (in this case the default) zoom level. And last, because the Picker Control should be invisible, its height is set to 0. The „zoomAction“ method is called whenever the crown is rotated which will then calulate the new zoom level and then update the map. As you can see, zooming can be implemented in just a few lines of code and is not very compicated.
    override func awake(withContext context: Any?) {

        let count = Int(maxZoomLevel-minZoomLevel)*2

        let pickerItem = WKPickerItem()

        let pickerItems = [WKPickerItem](repeatElement(pickerItem, count:count))

        pickerView.setItems(pickerItems)

        let idx = Int((zoomLevel - minZoomLevel) * 2)

        pickerView.setSelectedItemIndex(idx)

        pickerView.setHeight(0)

    }


    @IBAction func zoomAction(_ value: Int) {

        zoomLevel = Double(value) / 2 + minZoomLevel

        setupMap()

    }
Issue Three: Scrolling
In order to scroll the visible map region we can use a standard PanGestureRecognizer. Therefore simply add one into the maps view in the Storyboard and link it to the IBAction „scrollAction“ in the InterfaceController code file. Whenever the user moves his finger on the map, the „scrollAction” method will be called where we can then scroll the map accordingly.
The pan gesture recognizer will tell us the position of the finger on the screen, so to scroll the map we need the horizontal and vertical distance in pixels the finger has moved between calls of this method and transform these values into changes of the geographical coordinate. This calculation can be a little bit complicated because the earth is not flat, but projected on a flat screen. So moving the finger a certain distance on the screen does not translate in the same changes for latitude and longitude when beeing near the poles or near the equator. But fortunytely we do not need a perfect solution, an approximation is fine. More information about the details of the approximation which I’ve used can be found on this web page. Based on the movement of the finger in pixels this method calculates the changes for the latitude (dY) and longitude (dX), normalizes or „clips” these if they are getting to large or small and then use these to update the new center coordinate and finally update the map. We only accept longitude values between -180 and 180 and latitude values between -75 and 75. Though valid latitude values lie between -90 and 90, the limit to -75 to 75 makes life a lot of easier for this sample project. These values are used for the center of the visible map view, therefore the total visible range can be much larger. And because the map view can not handle a visible area which goes beyond the -90/90 boundary this limit will prevent any issues. If you need to inspect the poles as well, you need to add some more checks, which is omitted here to keep the example code simple.
    var touchPoint = CGPoint()


    @IBAction func scrollAction(_ sender: WKPanGestureRecognizer) {

        let pt = sender.locationInObject()

        if sender.state == .began {

            touchPoint = pt


        } else {

            let screenSize = WKInterfaceDevice.current().screenBounds.size

            let distance = visibleDistance


            let x = (touchPoint.x - pt.x) / screenSize.width * distance

            let y = (touchPoint.y - pt.y) / screenSize.width * distance


            let R:CGFloat = 111111

            var dY = y/R

            var dX = x/(R*cos(location.latitude/180 * Double.pi))


            while location.longitude + dX < -180 { dX += 360 }

            while location.longitude + dX > 180  { dX -= 360 }


            if location.latitude - dY > 75  { dY = location.latitude - 75 }

            if location.latitude - dY < -75 { dY = location.latitude + 75 }


            touchPoint = pt


            location.longitude += dX

            location.latitude -= dY

            setupMap()

        }

    }
Last Step
The very last step would be to update the map each time the zoom level has changed or the map is scrolled. This method is very simple again, based on the current center location and the visible distance (calculated from the zoom level) the region can be calculated using a MapKit method and then it will be passed to the map view which will then display the new region on the screen.
func setupMap() {

    let distance = visibleDistance

    let region = MKCoordinateRegion(center: location, latitudinalMeters: distance, longitudinalMeters: distance)

    mapView.setRegion(region)

}
Overall there’s not that much code necessary to implement scrolling and zooming for the classic watchOS API.
The complete source code of this App (XCode project) is also available for download.